IdP认证对接方案4-企业微信
感谢首师大张刚刚老师的文档勘误
作为IdP对接ldap、oauth、CAS之后的第4种身份认证方式,“IdP+企业微信”对接方案适用于学校内部准备采用企业微信完成CARSI认证的情况。所采用IdP版本为3.4.7。具体对接工作包括:
- 学校在本校的企业微信中申请“CARSI服务”应用;
- 配置“CARSI服务”应用;
安装配置CARSI IdP;
- IdP运行测试。
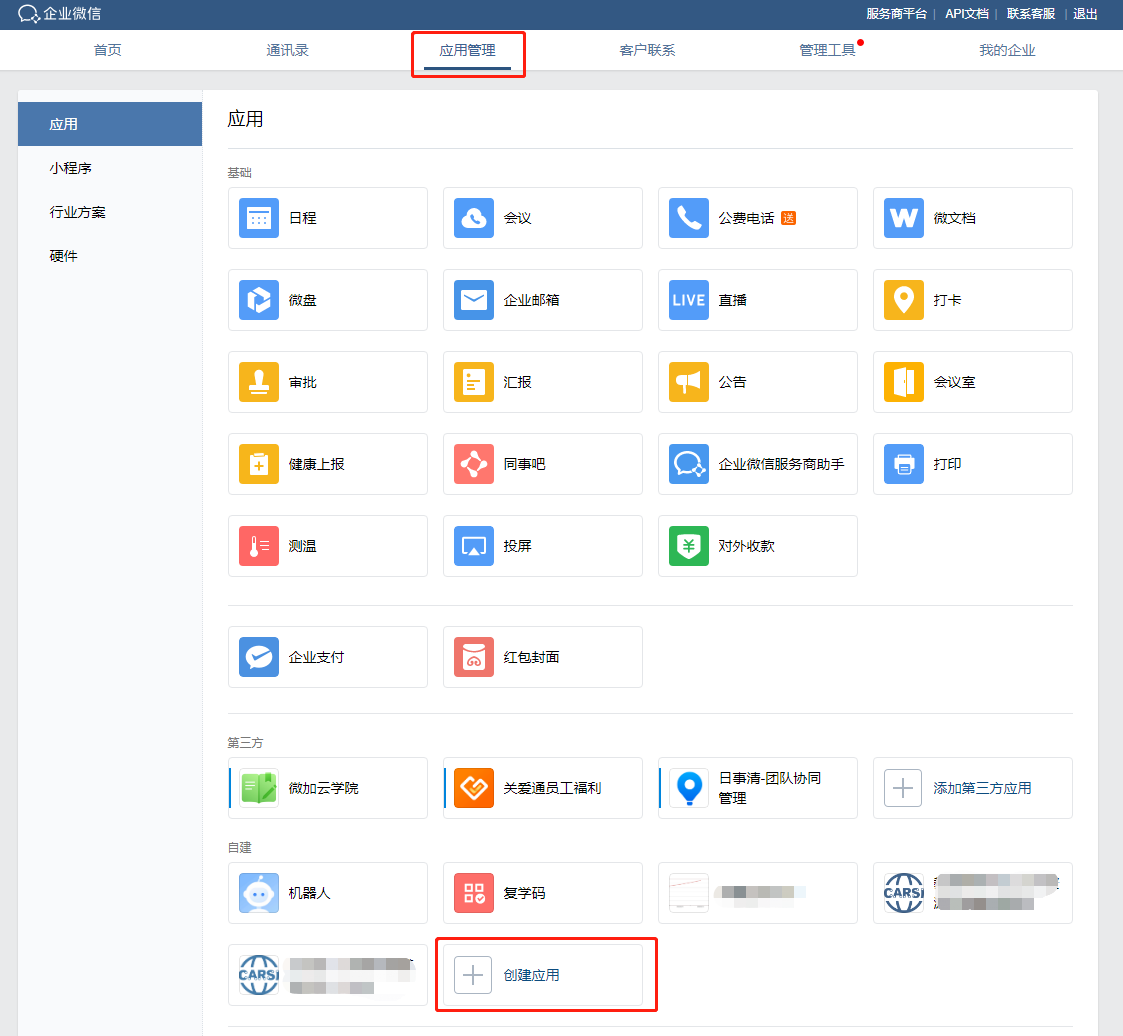
1、申请企业微信应用“CARSI资源服务”
进入企业微信,应用管理,自建,选择创建应用。如果已经申请过应用,直接进入应用详情页面
创建完成后,进入应用详情,记录AgentId和Secret,后续IdP安装与配置需要用到这两个参数。

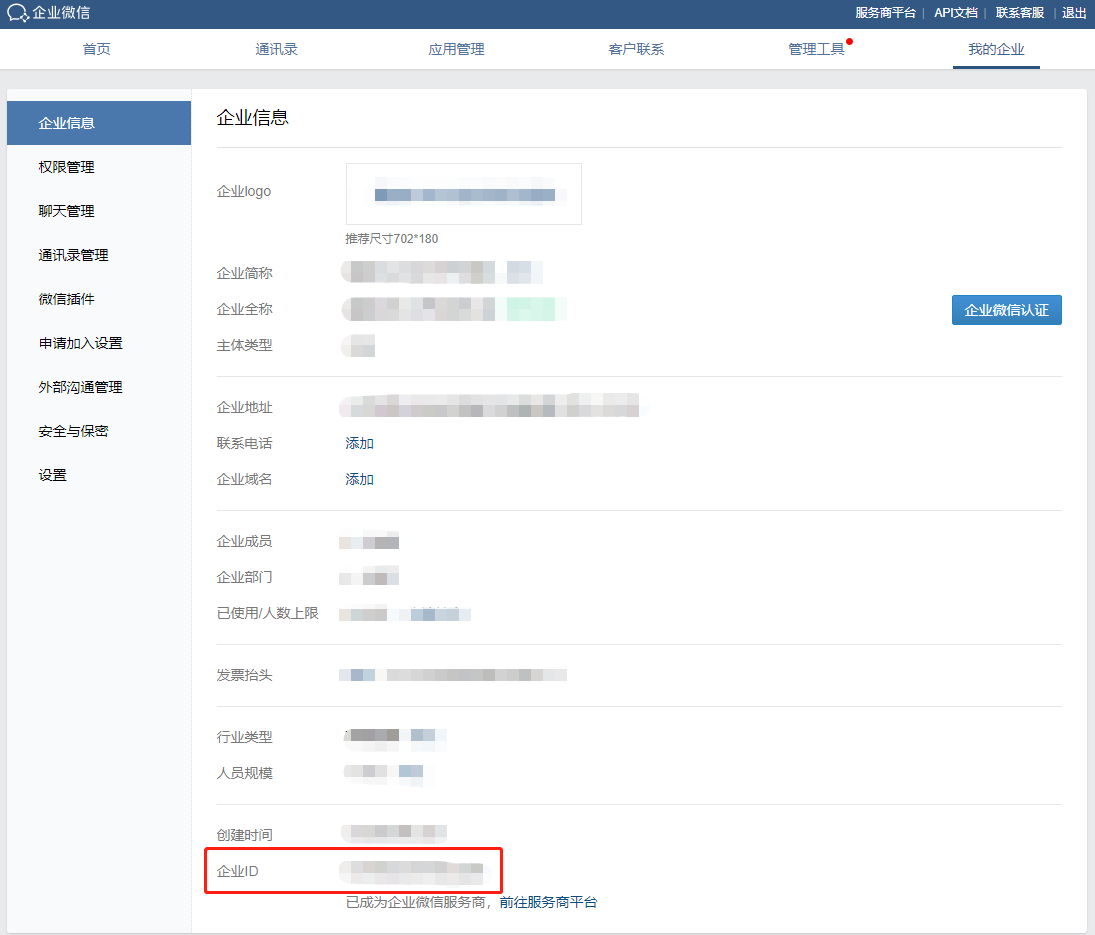
进入我的企业,获取企业ID。后续IdP安装与配置需要用到这个参数。
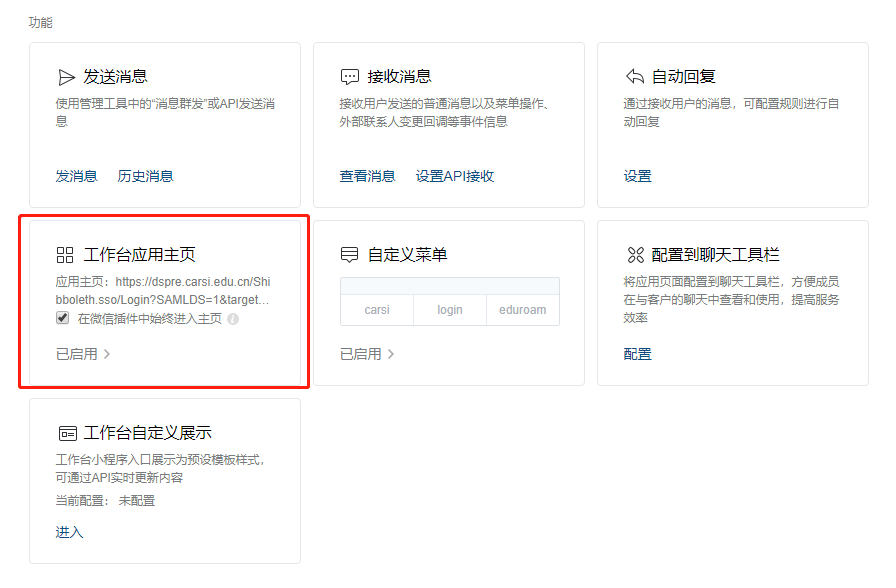
2、配置“CARSI资源共享”应用
进入应用详情,功能,将工作台应用主页修改成https://dspre.carsi.edu.cn/Shibboleth.sso/Login?SAMLDS=1&target=https%3A%2F%2Fdspre.carsi.edu.cn%2Fwxds&entityID=https%3A%2F%2F{SERVERNAME}%2Fidp%2Fshibboleth。
注意:请将{SERVERNAME}替换成IdP域名,如idp.xxx.edu.cn。
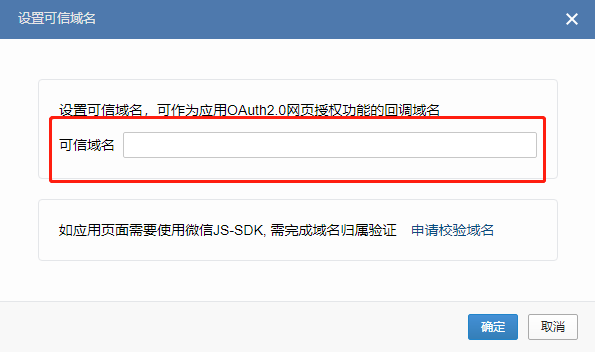
进入应用详情,开发者接口,企业微信授权登录,授权回调域名改成IdP域名,例如idp.xxx.edu.cn。
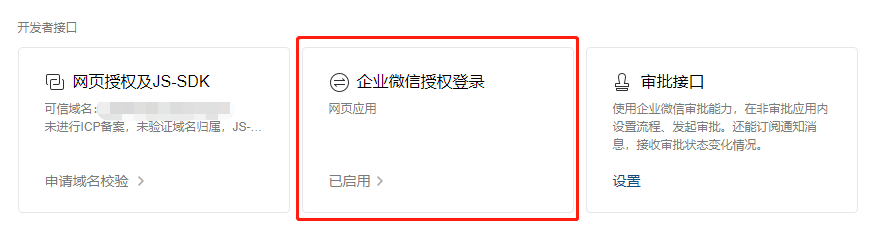
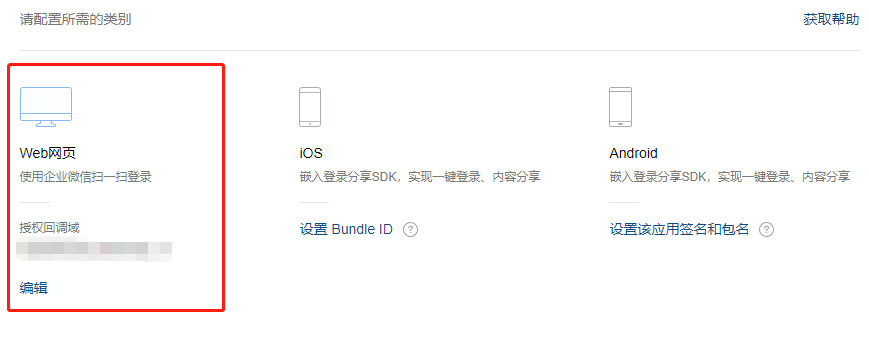
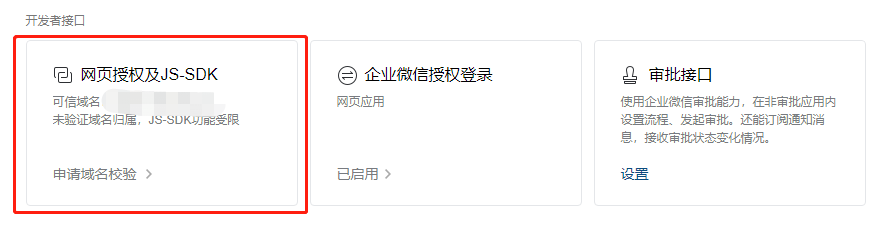
进入应用详情,开发者接口,网页授权及JS-SDK,设置改成IdP域名,例如idp.xxx.edu.cn。
3、安装配置CARSI IdP
3.1 准备IdP系统环境(CentOS8)
- 系统环境:CentOS 8 64bit 最小安装,内存≥4G,硬盘≥50G;
- IdP域名(网络中心维护,建议:idp.xxx.edu.cn;图书馆维护,建议:idp-lib.xxx.edu.cn),以及对应的https证书,域名一经确定,安装配置后无法修改;
- 网络可通达校园网外网,如果机器前面有防火墙,需要开通机器的TCP 80,443端口;
- 时间同步服务器,以ntp.aliyun.com为例,可根据校园网网络情况进行调整;
3.2 手动安装(CentOS8)
1. 基础配置(网络配置、修改主机名称、关闭selinux、配置时间同步)
#修改默认密码
[root@www ~]# passwd
#输入两次新密码

#配置网络
[root@www ~]# vi /etc/sysconfig/network-scripts/ifcfg-ens160
BOOTPROTO=static
ONBOOT=yes
IPADDR=IP地址
NETMASK=子网掩码
GATEWAY=默认网关
DNS1=DNS服务器

#修改
IPV6INIT=yes
IPV6_AUTOCONF=no
#新增
IPV6ADDR=IPv6地址,例如xxxx:xxxx:xxxx:xxxx::xxxx/64
IPV6_DEFAULTGW=IPv6网关,例如xxxx:xxxx:xxxx:xxxx::1

[root@www ~]# nmcli c reload

#修改主机名
[root@www ~]# vi /etc/hostname
#将localhost.localdomain改成主机域名,例如idp.xxx.xxx.xxx
[root@www ~]# hostname xxx.xxx.xxx.xxx
#修改hostname立即生效

#关闭SELinux
[root@www ~]#setenforce 0

#关闭开机启动SELinux
[root@www ~]# vi /etc/selinux/config
# line 7:修改为
SELINUX=disable

# 查看当前selinux状态
[root@www ~]# getenforce
Permissive #表示selinux已关闭

#配置时间同步
[root@www ~]# vi /etc/chrony.conf
#注释掉
#pool 2.centos.pool.ntp.org iburst
#新增时间同步服务器
pool ntp.aliyun.com iburst
#重启时间同步服务
[root@www ~]# systemctl restart chronyd
[root@www ~]# systemctl enable chronyd
#手动同步时间
[root@www ~]# chronyc -a makestep
200 OK #同步成功
#设置时区
[root@www ~]# timedatectl set-timezone Asia/Shanghai
#查看时间同步结果
[root@www ~]# timedatectl
               Local time: Thu 2020-07-02 14:51:24 CST
           Universal time: Thu 2020-07-02 06:51:24 UTC
                 RTC time: Thu 2020-07-02 06:51:23
                Time zone: Asia/Shanghai (CST, +0800)
System clock synchronized: yes
              NTP service: active
          RTC in local TZ: no
2.开放本机端口
IdP本机开放80、443端口,443端口提供web服务。80端口用于某些HTTPS证书在更新时的连接性测试(如Let's Encrypt),可根据实际情况选择是否开启。
本机防火墙上开放相应端口(http和https分别对应80和443)
注意:8443端口在SAML1协议中使用,新版IdP和SP采用SAML2协议,可以停止SAML1协议的支持,无需开启8443端口
[root@www ~]# firewall-cmd --add-service=http --permanent
[root@www ~]# firewall-cmd --add-service=https --permanent
刷新本机防火墙
[root@www ~]# firewall-cmd --reload
如果本机前面配置有其他防火墙,请联系防火墙管理员开通:外部服务器可访问本机80 、443端口(TCP端口)。
3.安装IdP运行环境
安装tomcat和nginx,tomcat是idp的运行容器,同时为了便于日志收集以及https证书配置,安装nginx提供web服务,用户直接访问nginx,nginx再将请求转发到tomcat,并返回该请求的响应结果。
1)安装JDK
[root@www ~]# dnf -y install java-11-openjdk java-11-openjdk-devel
[root@www ~]# cat > /etc/profile.d/java.sh <<'EOF'
export JAVA_HOME=$(dirname $(dirname $(readlink $(readlink $(which java)))))
export PATH=$PATH:$JAVA_HOME/bin
EOF
[root@www ~]# source /etc/profile.d/java.sh
[root@www ~]# java --version
openjdk 11.0.5 2019-10-15 LTS
OpenJDK Runtime Environment 18.9 (build 11.0.5+10-LTS)
OpenJDK 64-Bit Server VM 18.9 (build 11.0.5+10-LTS, mixed mode, sharing)
2)安装配置Tomcat
[root@www ~]# curl -O https://downloads.apache.org/tomcat/tomcat-9/v9.0.39/bin/apache-tomcat-9.0.39.tar.gz
[root@www ~]# tar zxvf apache-tomcat-9.0.39.tar.gz
[root@www ~]# mv apache-tomcat-9.0.39 /usr/libexec/tomcat9
[root@www ~]# useradd -M -d /usr/libexec/tomcat9 tomcat
[root@www ~]# chown -R tomcat. /usr/libexec/tomcat9
[root@dlp ~]# vi /usr/lib/systemd/system/tomcat9.service
# create new
[Unit]
Description=Apache Tomcat 9
After=network.target

[Service]
Type=oneshot
ExecStart=/usr/libexec/tomcat9/bin/startup.sh
ExecStop=/usr/libexec/tomcat9/bin/shutdown.sh
RemainAfterExit=yes
User=tomcat
Group=tomcat

[Install]
WantedBy=multi-user.target

[root@dlp ~]# systemctl enable --now tomcat9

#tomcat配置
#新建idp.xml
[root@www ~]# vi /usr/libexec/tomcat9/conf/Catalina/localhost/idp.xml
<Context docBase="/opt/shibboleth-idp/war/idp.war"
                privileged="true"
                antiResourceLocking="false"
                antiJARLocking="false"
                unpackWAR="false"
                swallowOutput="true" />

[root@www ~]# vi /usr/libexec/tomcat9/conf/server.xml
#在倒数第3行</Engine>前面,增加下述配置。从而将传递给应用的客户端ip和请求协议替换为X-Forwarded-For和X-Forwarded-Proto中的值。
   <Valve className="org.apache.catalina.valves.RemoteIpValve"
           internalProxies="127.0.0.1|0:0:0:0:0:0:0:1"
           remoteIpHeader="x-forwarded-for"
           protocolHeader="x-forwarded-proto"
    />
3)安装配置Nginx
[root@www ~]# dnf -y install nginx
[root@www ~]# vi /etc/nginx/nginx.conf
# line 41: change to your hostname
server_name www.srv.world;
#配置http自动跳转至https
在listen       [::]:80 default_server;后加上
return       301 https://$host$request_uri;
#将默认的https配置部分取消注释,其中/etc/nginx/fullchain.pem请替换成证书的绝对路径,/etc/nginx/privkey.pem请替换成证书key的绝对路径
    server {
        listen       443 ssl http2 default_server;
        listen       [::]:443 ssl http2 default_server;
        server_name  idp.xxx.edu.cn;
        root         /usr/share/nginx/html;

        ssl_certificate "/etc/nginx/fullchain.pem";
        ssl_certificate_key "/etc/nginx/privkey.pem";
        ssl_session_cache shared:SSL:1m;
        ssl_session_timeout  10m;
        ssl_ciphers PROFILE=SYSTEM;
        ssl_prefer_server_ciphers on;

        # Load configuration files for the default server block.
        include /etc/nginx/default.d/*.conf;

        location / {
        }

        error_page 404 /404.html;
            location = /40x.html {
        }

        error_page 500 502 503 504 /50x.html;
            location = /50x.html {
        }
    }
[root@www ~]# systemctl enable --now nginx

#新建idp.xml
[root@www ~]# vi /etc/nginx/nginx.conf
#在server标签里面新增
      location /idp {
        proxy_pass      http://localhost:8080/idp;
        proxy_set_header Host $host;
        proxy_set_header X-Forwarded-For $proxy_add_x_forwarded_for;
        proxy_set_header X-Forwarded-Proto $scheme;
      }
4. 安装配置IdP
1)安装IdP包
[root@www ~]# curl -O https://shibboleth.net/downloads/identity-provider/3.4.7/shibboleth-identity-provider-3.4.7.tar.gz
[root@www ~]# tar zxvf shibboleth-identity-provider-3.4.7.tar.gz
[root@www ~]# cd shibboleth-identity-provider-3.4.7
[root@www ~]# ./bin/install.sh
Source (Distribution) Directory (press <enter> to accept default): [/root/inst/shibboleth-identity-provider-3.x.x] #默认回车
Installation Directory: [/opt/shibboleth-idp] #默认回车
Hostname: [idp.xxx.edu.cn] enter #确认是修改后的域名,无误后回车
SAML EntityID: [https://域名/idp/shibboleth] #默认回车
Attribute Scope: [xxx.edu.cn] #输入学校域名,如xxx.edu.cn 回车
Backchannel PKCS12 Password: #创建后台证书密码
Re-enter password: #再输入一遍
Cookie Encryption Key Password: #创建Cookie加密密码
Re-enter password: #再输入一遍
Warning: /opt/shibboleth-idp/bin does not exist.
Warning: /opt/shibboleth-idp/dist does not exist.
Warning: /opt/shibboleth-idp/doc does not exist.
Warning: /opt/shibboleth-idp/system does not exist.
Warning: /opt/shibboleth-idp/webapp does not exist.
Generating Signing Key, CN = 域名 URI = https://域名/idp/shibboleth ...
...done
Creating Encryption Key, CN = 域名 = https://域名/idp/shibboleth ...
...done
Creating Backchannel keystore, CN = 域名 URI = https://域名/idp/shibboleth ...
...done
Creating cookie encryption key files...
...done
Rebuilding /opt/shibboleth-idp/war/idp.war ...
...done
BUILD SUCCESSFUL
#安装成功
2)配置IdP
Tomcat 默认没有提供 Java Server Tag Library,这使得 IdP3 的 status 页面无法显示。解决的办法是下载 jstl的jar包,然后放在/opt/shibboleth-idp/edit-webapp/WEB-INF/lib/ 内,然后需要重新 Build 一下 idp。在 idp.home 的目录下,./bin/build.sh 即可
将no-conversation-state.rar解压缩后的no-conversation-state.jsp放到/opt/shibboleth-idp/edit-webapp里面,将json-20200518.jar、shib-cas-authenticator-3.3.0.jar和cas-client-core-3.6.0.jar放到/opt/shibboleth-idp/edit-webapp/WEB-INF/lib目录下,将web.rar解压缩后的web.xml放到/opt/shibboleth-idp/edit-webapp/WEB-INF/下
[root@www ~]# cd /opt/shibboleth-idp/edit-webapp/WEB-INF/lib/
[root@www ~]# curl -O https://build.shibboleth.net/nexus/service/local/repositories/thirdparty/content/javax/servlet/jstl/1.2/jstl-1.2.jar
[root@www ~]# cd /opt/shibboleth-idp/bin
[root@www ~]# ./build.sh
Installation Directory: [/opt/shibboleth-idp] #回车
Rebuilding /opt/shibboleth-idp/war/idp.war ...
...done
BUILD SUCCESSFUL
更新idp.properties
[root@www ~]# vi /opt/shibboleth-idp/conf/idp.properties
#修改
idp.authn.flows=External
#新增,将{APPID}替换成应用的secret,将{APPSECRET}替换成企业ID,将{AgentID}替换成应用的agentid,将{SERVERNAME}替换成idp的域名
shibcas.oauth2UrlPrefix = https://open.weixin.qq.com/connect/oauth2/authorize
shibcas.oauth2LoginUrl = ${shibcas.oauth2UrlPrefix}?appid={APPSECRET}&response_type=code&scope=snsapi_base&state=STATE
shibcas.oauth2LoginUrlh5 = https://open.work.weixin.qq.com/wwopen/sso/qrConnect?appid={APPSECRET}&agentid={AgentID}&state=STATE
shibcas.serverName = https://{SERVERNAME}
shibcas.oauth2TokenUrl = https://qyapi.weixin.qq.com/cgi-bin/gettoken
shibcas.oauth2ResourceUrl = https://qyapi.weixin.qq.com/cgi-bin/user/getuserinfo
shibcas.oauth2GetUserUrl = https://qyapi.weixin.qq.com/cgi-bin/user/get
shibcas.oauth2clientid = {APPSECRET}
shibcas.oauth2clientsecret = {APPID}
shibcas.oauth2redirecturi = https%3a%2f%2f{SERVERNAME}%2fidp%2fAuthn%2fExternal%3fconversation%3de1s1
shibcas.getdepartmentUrl = https://qyapi.weixin.qq.com/cgi-bin/department/list
2.1)属性定义
配置属性释放,用以下内容替换/opt/shibboleth-idp/conf/attribute-resolver.xml文件。
修改<AttributeDefinition xsi:type="ScriptedAttribute" id="eduPersonScopedAffiliation">中的<Script>部分,根据position的实际取值进行映射的调整。关于身份属性取值,需要将本地用户身份的取值,对应到CARSI联盟标准取值,包括:faculty(教师),student(学生),staff(教工),employee(雇员),member(各类人员,包括faculty、student、staff、employee),alum(校友),affiliate(附属人员或临聘,常用),other(CARSI补充,不建议优先使用)。建议配置时尽可能细化用户身份分类,避免后期修改配置。
注意:默认使用企业微信的position表示用户身份。
<?xml version="1.0" encoding="UTF-8"?>
<AttributeResolver
        xmlns="urn:mace:shibboleth:2.0:resolver"
        xmlns:xsi="http://www.w3.org/2001/XMLSchema-instance"
        xsi:schemaLocation="urn:mace:shibboleth:2.0:resolver http://shibboleth.net/schema/idp/shibboleth-attribute-resolver.xsd">

    <!-- ========================================== -->
    <!--      Attribute Definitions                 -->
    <!-- ========================================== -->

    <AttributeDefinition xsi:type="ScriptedAttribute" id="eduPersonScopedAffiliation">
        <Dependency ref="position" />
        <Script><![CDATA[
        var localpart = "";
        if(typeof(position)=="undefined"){
            localpart = "member";
        }else{
            if(position.getValues().get(0)=="staf") localpart = "staff";
            else if(position.getValues().get(0)=="std") localpart = "student";
            else localpart = "member";
        }
        eduPersonScopedAffiliation.addValue(localpart + "@%{idp.scope}");
            ]]></Script>
        <AttributeEncoder xsi:type="SAML1String" name="urn:mace:dir:attribute-def:eduPersonScopedAffiliation" encodeType="false" />
        <AttributeEncoder xsi:type="SAML2String" name="urn:oid:1.3.6.1.4.1.5923.1.1.1.9" friendlyName="eduPersonScopedAffiliation" encodeType="false" />
    </AttributeDefinition>

    <AttributeDefinition xsi:type="SubjectDerivedAttribute" id="position" principalAttributeName="position"></AttributeDefinition>

    <AttributeDefinition xsi:type="Scoped" id="eduPersonPrincipalName" scope="%{idp.scope}">
        <InputAttributeDefinition ref="uid" />
        <AttributeEncoder xsi:type="SAML1ScopedString" name="urn:mace:dir:attribute-def:eduPersonPrincipalName" encodeType="false" />
        <AttributeEncoder xsi:type="SAML2ScopedString" name="urn:oid:1.3.6.1.4.1.5923.1.1.1.6" friendlyName="eduPersonPrincipalName" encodeType="false" />
    </AttributeDefinition>

    <AttributeDefinition id="uid" xsi:type="PrincipalName">
        <AttributeEncoder xsi:type="SAML1String" name="urn:mace:dir:attribute-def:uid" encodeType="false" />
        <AttributeEncoder xsi:type="SAML2String" name="urn:oid:0.9.2342.19200300.100.1.1" friendlyName="uid" encodeType="false" />
    </AttributeDefinition>

    <AttributeDefinition id="eduPersonTargetedID" xsi:type="SAML2NameID" nameIdFormat="urn:oasis:names:tc:SAML:2.0:nameid-format:persistent">
        <InputDataConnector ref="ComputedIDConnector" attributeNames="computedID"/>
        <AttributeEncoder xsi:type="SAML1XMLObject" name="urn:oid:1.3.6.1.4.1.5923.1.1.1.10" encodeType="false"/>
        <AttributeEncoder xsi:type="SAML2XMLObject" name="urn:oid:1.3.6.1.4.1.5923.1.1.1.10" friendlyName="eduPersonTargetedID" encodeType="false"/>
    </AttributeDefinition>

    <AttributeDefinition id="eduPersonEntitlement" xsi:type="Simple">
        <InputDataConnector ref="staticAttributes" attributeNames="eduPersonEntitlement" />
        <AttributeEncoder xsi:type="SAML1String" name="urn:mace:dir:attribute-def:eduPersonEntitlement" encodeType="false"/>
        <AttributeEncoder xsi:type="SAML2String" name="urn:oid:1.3.6.1.4.1.5923.1.1.1.7" friendlyName="eduPersonEntitlement" encodeType="false"/>
    </AttributeDefinition>

    <DataConnector id="ComputedIDConnector" xsi:type="ComputedId" generatedAttributeID="computedID" salt="xxxxxxxxxxxxxxxxxxxx" encoding="BASE64">
        <InputAttributeDefinition ref="eduPersonPrincipalName" />
    </DataConnector>

    <DataConnector id="staticAttributes" xsi:type="Static">
        <Attribute id="eduPersonEntitlement">
        <Value>urn:mace:dir:entitlement:common-lib-terms</Value>
        </Attribute>
    </DataConnector>

</AttributeResolver>
2.2)释放用户属性
2.3)IdP隐私保护配置
2.4)Metadata配置
下载https://dspre.carsi.edu.cn/carsifed-metadata-pre.xml 文件,放入/opt/shibboleth-idp/metadata文件夹,并且修改文件的所属用户和组。
[root@www ~]# chown -R tomcat.tomcat /opt/shibboleth-idp
将联盟提供的metadata验证证书dsmeta.pem放入/opt/shibboleth-idp/credentials目录下。修改metadata-providers.xml,maxRefreshDelay="PT10M"表示metadata最长更新时间10分钟。
[root@www ~]# vi /opt/shibboleth-idp/conf/metadata-providers.xml

#在</MetadataProvider>内新增
<MetadataProvider id="HTTPMetadata"
          xsi:type="FileBackedHTTPMetadataProvider"
          backingFile="/opt/shibboleth-idp/metadata/carsifed-metadata-pre.xml"
          minRefreshDelay="PT5M"
          maxRefreshDelay="PT10M"
          metadataURL="https://dspre.carsi.edu.cn/carsifed-metadata-pre.xml">

         <MetadataFilter xsi:type="SignatureValidation" certificateFile="/opt/shibboleth-idp/credentials/dsmeta.pem" />
         <MetadataFilter xsi:type="EntityRoleWhiteList">
             <RetainedRole>md:SPSSODescriptor</RetainedRole>
         </MetadataFilter>
     </MetadataProvider>
重启tomcat和apache
[root@www ~]# chown -R tomcat.tomcat /opt/shibboleth-idp
#启动tomcat和apache
[root@www ~]# systemctl restart tomcat9
[root@www ~]# systemctl restart nginx
2.5)日志功能
[root@www ~]# vi /opt/shibboleth-idp/conf/audit.xml

#line 18 替换
<entry key="Shibboleth-Audit" value="%T|%b|%I|%SP|%P|%IdP|%bb|%III|%u|%ac|%attr|%n|%i|%a|%s|" />

#取消注释
<bean id="shibboleth.AuditDateTimeFormat" class="java.lang.String" c:_0="YYYY-MM-dd'T'HH:mm:ss.SSSZZ" />
<util:constant id="shibboleth.AuditDefaultTimeZone" static-field="java.lang.Boolean.TRUE" />

[root@www ~]# mkdir /usr/share/nginx/html/auditlog
[root@www ~]# vi /etc/nginx/nginx.conf

#在location /idp前面增加
    location /auditlog {
        allow 115.27.243.6;
        deny all;
    }

#新建
[root@www ~]# vi /usr/share/nginx/html/auditlog/auditlog.sh
rm -rf /usr/share/nginx/html/auditlog/auditlog-`date -d -24hours +%Y-%m-%d-%H`.log
grep `date -d -1hours +%Y-%m-%dT%H` /opt/shibboleth-idp/logs/idp-audit.log > /usr/share/nginx/html/auditlog/auditlog-`date -d -1hours +%Y-%m-%d-%H`.log

#添加定时任务
[root@www ~]# crontab -e
0 */1 * * * sh /usr/share/nginx/html/auditlog/auditlog.sh >/dev/null 2>&1

#重启tomcat和apache
[root@www ~]# systemctl restart tomcat9
[root@www ~]# systemctl restart nginx
4、IdP运行测试
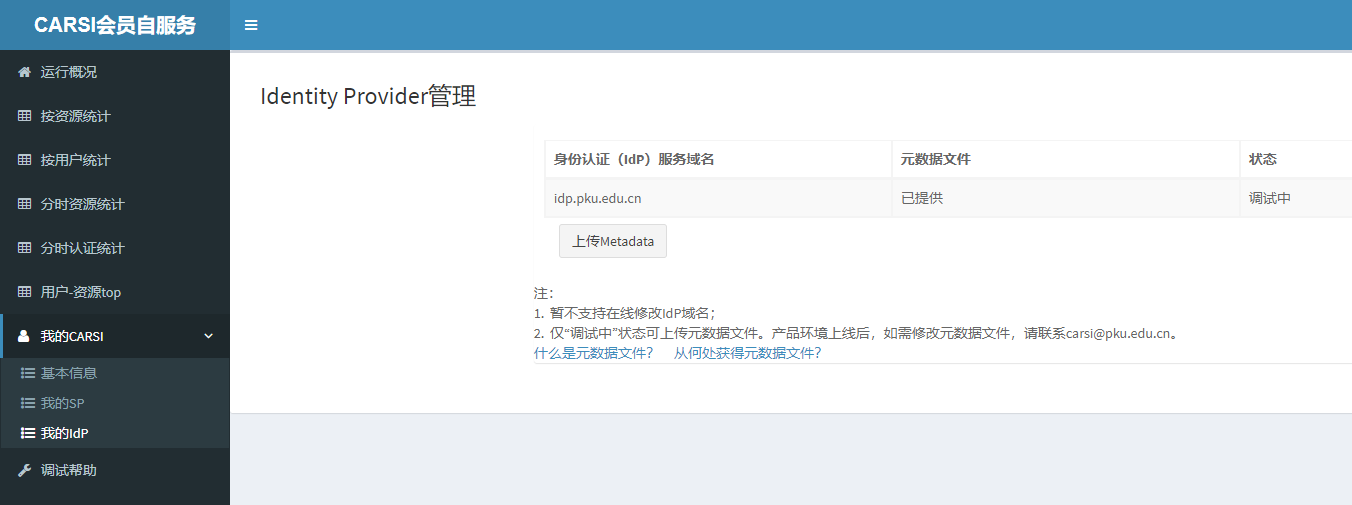
1)向CARSI联盟提交IdP配置信息(上传IdP Metadata)
将/opt/shibboleth-idp/metadata/idp-metadata.xml文件下载到本地。
登陆 CARSI会员自服务系统 用户名为申请时填的学校域名,密码为申请时填的项目负责人的手机号。
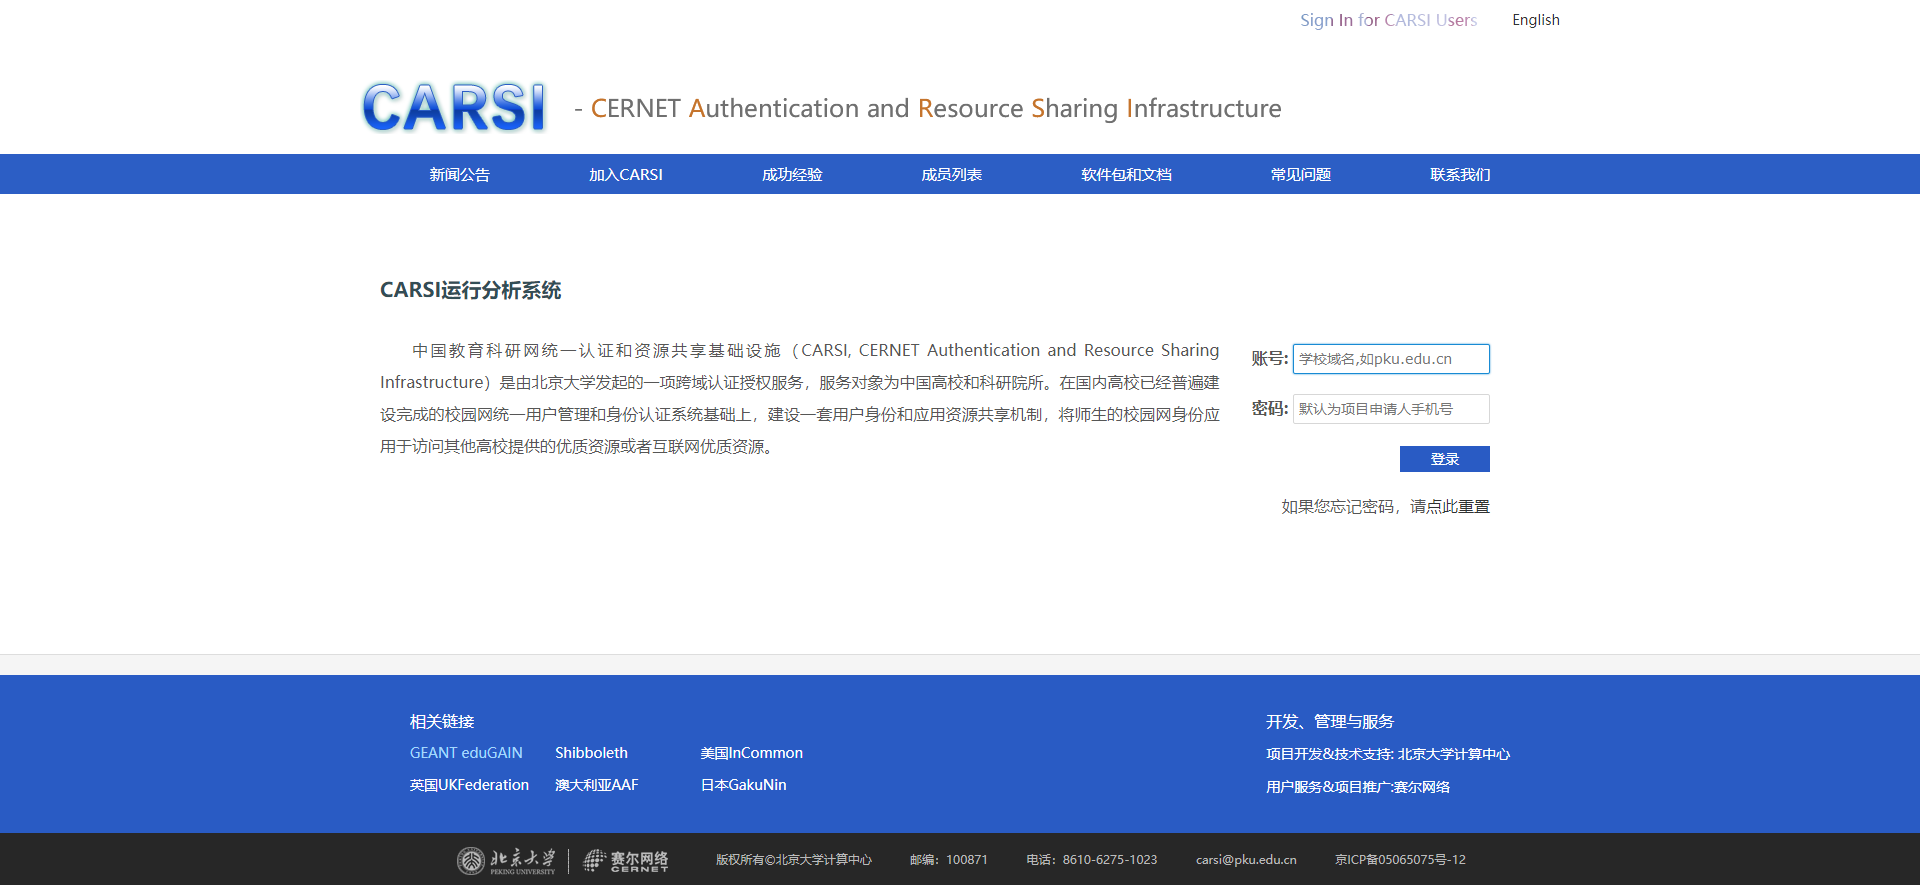
在“我的CARSI→我的IdP”中,选择“上传Metadata”完成该文件的上传,上传成功后该页面会显示“已提供”。
2)PC端测试步骤
3)企业微信端测试
版权所有©北京大学计算中心