ova镜像快速安装(ova第2/6步)
- carsi_pku_team
ova镜像安装,基于CARSI联盟提供的虚拟机ova镜像完成,只需完成必要的主机时间同步、配置本机IdP域名、配置本机IdP证书、上传IdP Metadata等功能。请按照“审核通过”邮件的提示下载idp ova镜像文件。
下一步:配置IdP认证对接及属性定义(ova第3/6、4/6步,手动第3/9、4/9步)。
1. 安装前准备
#修改默认密码
[root@www ~]# passwd
#输入两次新密码

#配置网络
[root@www ~]# vi /etc/sysconfig/network-scripts/ifcfg-ens160
#修改
IPADDR=IP地址
NETMASK=子网掩码
GATEWAY=默认网关
DNS1=DNS服务器
#如果需要配置IPv6地址,修改
IPV6INIT=yes
IPV6_AUTOCONF=no
#新增
IPV6ADDR=IPv6地址,例如xxxx:xxxx:xxxx:xxxx::xxxx/64
IPV6_DEFAULTGW=IPv6网关,例如xxxx:xxxx:xxxx:xxxx::1
[root@www ~]# systemctl restart network

#修改主机名
[root@www ~]# vi /etc/hostname
#将localhost.localdomain改成主机域名,例如idp.xxx.xxx.xxx,然后重启
[root@www ~]# reboot
如果要使IdP支持IPv6访问,需要为IdP域名添加AAAA记录解析,同时为IdP服务器配置IPv6地址
#域名服务器上添加AAAA记录解析,idp.xxx.xxx.xxx为idp服务器域名,xxxx:xxxx:xxxx:xxxx::xxxx为IPv6地址
idp.xxx.xxx.xxx  IN  AAAA  xxxx:xxxx:xxxx:xxxx::xxxx

#IdP服务器配置IPv6地址
[root@www ~]# vi /etc/sysconfig/network-scripts/ifcfg-ens160
#修改
IPV6INIT=yes
IPV6_AUTOCONF=no
#新增
IPV6ADDR=IPv6地址,例如xxxx:xxxx:xxxx:xxxx::xxxx/64
IPV6_DEFAULTGW=IPv6网关,例如xxxx:xxxx:xxxx:xxxx::1
[root@www ~]# systemctl restart network
1.1 设置时间同步
Shibboleth IdP需要和其他CARSI组件严格校准时间,以保证服务正常运行。现在时间同步服务器默认设置为server ntp.aliyun.com,如需要更改:
编辑 /etc/ntp.conf,将ntp.aliyun.com更改为新的时间同步服务器,并重启。
[root@www ~]# vi /etc/ntp.conf
server ntp.aliyun.com
[root@www ~]# service restart ntpd
2. 安装&本地配置IdP
2.1 安装IdP
请提前确认好Hostname(IdP所使用的域名)和Attribute Scope(xxx.edu.cn)参数,安装过程中会根据这两个参数生成多个文件,且安装后无法更改。
[root@www ~]# sh /root/inst/idp3config/autoconfig.sh
Source (Distribution) Directory (press <enter> to accept default): [/root/inst/shibboleth-identity-provider-3.x.x] #默认回车
Installation Directory: [/opt/shibboleth-idp] #默认回车
Hostname: [idp.xxx.edu.cn] enter #确认是修改后的域名,无误后回车
SAML EntityID: [https://idp.xxx.edu.cn/idp/shibboleth] #默认回车
Attribute Scope: [xxx.edu.cn] #输入学校域名,如xxx.edu.cn 回车
Backchannel PKCS12 Password: #创建后台证书密码
Re-enter password: #再输入一遍
Cookie Encryption Key Password: #创建Cookie加密密码
Re-enter password: #再输入一遍
Warning: /opt/shibboleth-idp/bin does not exist.
Warning: /opt/shibboleth-idp/dist does not exist.
Warning: /opt/shibboleth-idp/doc does not exist.
Warning: /opt/shibboleth-idp/system does not exist.
Warning: /opt/shibboleth-idp/webapp does not exist.
Generating Signing Key, CN = 域名 URI = https://域名/idp/shibboleth ...
...done
Creating Encryption Key, CN = 域名 = https://域名/idp/shibboleth ...
...done
Creating Backchannel keystore, CN = 域名 URI = https://域名/idp/shibboleth ...
...done
Creating cookie encryption key files...
...done
Rebuilding /opt/shibboleth-idp/war/idp.war ...
...done
BUILD SUCCESSFUL
Enter Import Password: #输入安装过程中创建的后台证书密码
#安装成功
2.2 配置https证书
采用学校提供的证书,并配置证书路径,crt+key证书和pem证书都行
证书由学校自行选购。可以使用免费 let’s encrypt 来进行证书签发部署,并自动续签,详请可以参考https://eac.cloud.sh.edu.cn/document/lets_encrypt/;也可以选取教育网域名安全证书服务,联系赛尔各地分公司购买商业证书,获取技术支持,详请参见https://ssl.cernet.com。
[root@www ~]# vi /etc/httpd/conf.d/idp.conf
# line 17、18: 改为
SSLCertificateFile cert证书绝对路径cert.pem
SSLCertificateKeyFile privkey绝对路径privkey.pem

#完成后重启服务
[root@www ~]# systemctl restart httpd
[root@www ~]# systemctl restart tomcat
2.3 修改Apache Tomcat AJP连接秘钥
2020年1月6日,国家信息安全漏洞共享平台(CNVD)收录了由北京长亭科技有限公司发现并报送的Apache Tomcat文件包含漏洞(CNVD-2020-10487,对应CVE-2020-1938)。攻击者利用该漏洞,可在未授权的情况下远程读取特定目录下的任意文件。解决办法需要为AJPConnector配置requiredSecret来设置AJP协议认证凭证。
[root@www ~]# vi /etc/tomcat/server.xml
#找到
<Connector port="8009" address="127.0.0.1"
              enableLookups="false" redirectPort="443" protocol="AJP/1.3"
              tomcatAuthentication="false" requiredSecret="replaceyoursecret"/>
#将replaceyoursecret替换成一个安全性高、无法被轻易猜解的值

[root@www ~]# vi /etc/httpd/conf.d/idp.conf
#找到
ProxyPass /idp ajp://localhost:8009/idp secret=replaceyoursecret retry=5
#将replaceyoursecret替换成刚刚设定的值

[root@www ~]# vi /etc/httpd/conf.d/idp8443.conf
#找到
ProxyPass /idp ajp://localhost:8009/idp secret=replaceyoursecret retry=5
#将replaceyoursecret替换成刚刚设定的值

#完成后重启服务
[root@www ~]# systemctl restart httpd
[root@www ~]# systemctl restart tomcat
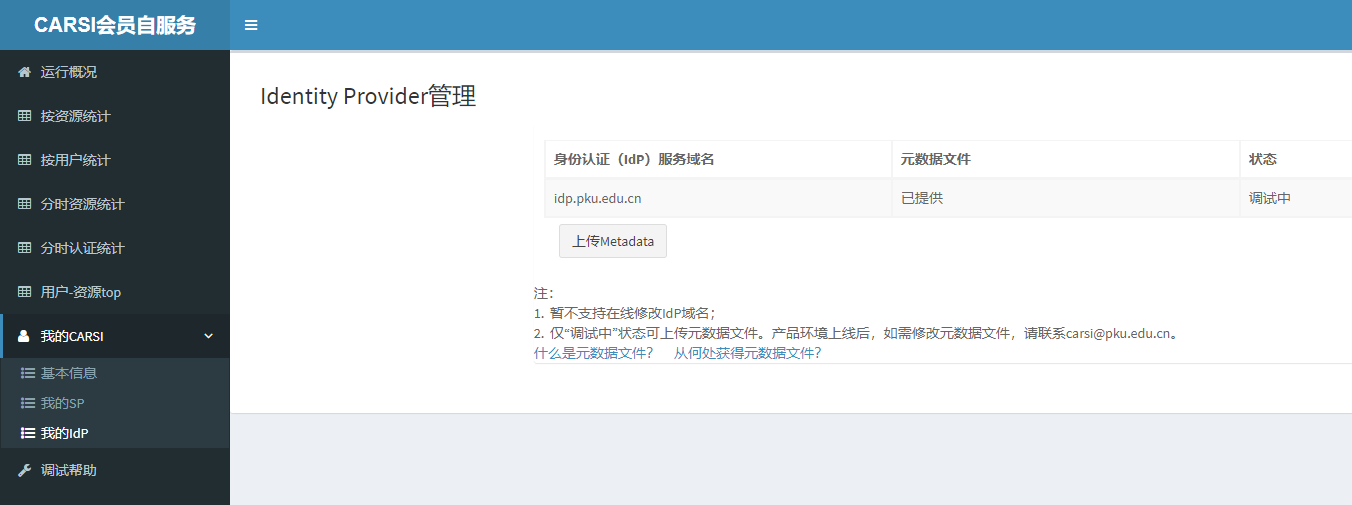
2.4 向CARSI联盟提交IdP配置信息(上传IdP Metadata)
将/opt/shibboleth-idp/metadata/idp-metadata.xml文件下载到本地。
登陆 CARSI会员自服务系统 用户名为申请时填的学校域名,密码为申请时填的项目负责人的手机号。
在“我的CARSI→我的IdP”中,选择“上传Metadata”完成该文件的上传,上传成功后该页面会显示“已提供”。
注:ova镜像方式已经默认配置隐私保护以及日志采集,请不要重复配置
2.5 执行启动IdP脚本
#启动IdP
[root@www ~]# sh /root/inst/idp3config/startidp.sh
ova镜像安装,基于CARSI联盟提供的虚拟机ova镜像完成,只需完成必要的主机时间同步、配置本机IdP域名、配置本机IdP证书、上传IdP Metadata等功能。请按照“审核通过”邮件的提示下载idp ova镜像文件。
版权所有©北京大学计算中心